How To Get Started Quilting – Classes, Materials, and Expenses
Quilting is a fascinating art form. It allows for the maker to be super creative if they want to, but also lends itself nicely to people who just want an easy project. You can decide how elaborate you want your quilt to be.
Read on to learn more about the art of quilting as well as everything you will need to complete a quilt on your own!
How Quilting Has Evolved Over Time
Quilting has been a tradition in families all over the world for many generations. Originally quilting was all done by hand, long before sewing machines existed. Typically a quilt was made our of old clothing just for the purpose of keeping warm.
Many times the quilt was used to tell a story. Squares were put together in an order that could be interpreted by others for entertainment. Family history was also woven into many quilts as a way of passing down their family stories.
Quilting has also been a useful tool throughout history. During the Civil War, Abolitionists made quilts to sell in order to raise money for their cause. Similarly, today there are organizations all over the world that make and sell quilts for various causes.
Materials and Tools
Here is a list of the necessary materials and tools that you will need to complete your quilt. There is also a list of suggested materials that are optional. This is simply a list to make shopping easier, but you will learn more about all of them as you read on.
Necessary Materials
• Sewing machine
• Fabric scissors
• Ball pins
• Curved quilting safety pins
• Seam ripper
• Selection of 100% cotton material
• Batting
• 100% cotton material for backing
• Bias tape
• Cutting mat with ruler
• Rotary cutter
• Quilting needles
Suggested Materials
• Quilting books and/or patterns
• Quilting hoop
• Thimble
• Beeswax
• Quilter’s square ruler
• Quilting stencils
• Washable marker or pencil
• “Handmade by” tag
• Bias tape maker
Costs Involved
The cost of quilting can be very affordable or very expensive. The cost depends on several variables including fabrics, patterns and classes. There are also many tools that make quilting easier, but they are not necessary.
Fabrics can be purchased at large competitively priced stores for as low as .99 per yard. You can also purchase lavish fabric from an upscale quilting specialty store for $30.00 per yard or even more. You can vary your total cost greatly simply by the fabric you choose to use.
If you decide that you love quilting, you can add tools as you go to help keep the cost down in the beginning.
Options for Classes
Many fabric and craft stores offer classes for both beginning and seasoned quilters. Classes are often help in small groups and tools are often available for your use. This is a great way to try out quilting before you decide to invest in all of the tools.
Be sure to read the class description. At some classes you will only learn certain steps of the whole process, while other classes will meet every step of the way until the quilt is complete. You may also choose to take a class that focuses on all of the steps, but in a smaller project like a placemat.
There are also online sites, both subscription and free, that offer classes. This is a great option if you like to be able to put the instructor on pause while you catch up. If you like to ask a lot of questions, then it may be better to find an in-person class.
Many churches and other groups offer quilting get-togethers, and some have official quilting guilds. Even if they do not offer an actual class, they are often more than willing to teach newcomers with one-on-one instruction. Sometimes, this is even better than a regular class.
Keep in mind that if you learn about quilting from multiple sources, then chances are very good that you will learn multiple ways. There are many different ways to complete the process and the order of some steps can be changed for personal preference. For example, most people do the quilting before the binding, but some do it after.
Keep in mind that the more you practice the art of quilting, the easier it will be to determine what will work best for you. Follow the instructions in the beginning, but understand that it is okay to tweak things as you continue to make new quilts. The important thing is that you enjoy the process and the final product.
Finding and Choosing Patterns
The trickiest part of quilting just may be choosing a pattern. You can find free patterns online, and you can also find very expensive patterns online. Quilt shops, fabric stores and craft stores also have a huge selection of ways to purchase patterns.
One of the most common ways to purchase a pattern is by buying a book that has many different quilt patterns in it. You can purchase these based on many criteria from quilting with scraps to quilting for each holiday. You can also use the books to inspire you to decide what types of quilts you find most interesting.
Check Out Our List Of Over 100 Quilting Blogs Here On Stitching Jules
Single patterns are also available at most quilt and craft stores. You can find patterns for entire quilts this way, but you can also find patterns for quilting smaller projects. Handbags, table runners and sewing machine covers are just a few of the different types of patterns you may find.
Finally, if you want inspiration and fresh ideas on a regular basis, there are dozens of quilting magazines. Quilting magazines often come with patterns for both full quilts and smaller projects. You will also gain insights reading articles written by fellow quilters.
Most patterns call for you to piece together fabrics to form a square. Then those squares are pieced together to form a large rectangle. Other patterns may call for strips of fabrics or fancy appliqué.
When you are beginning, a simple square pattern is best. Some recommended squares for beginners are 4-patch, 9-patch or an x-patch. The x-patch can also be pieced together as an o-patch, so these squares pieced together are called a hugs and kisses quilt.
If you are making a simple quilt, you can have one done in a few days. If you are making a more complex design or if you are doing all of the quilting by hand, then it can take months or even longer. When choosing a pattern, keep in mind how much time you would like to spend on this quilt.
Choosing Your Fabrics
Fabrics for quilting are priced to purchase by the yard, but most places will allow you to buy less and charge proportionately. Precut fabrics are also available in coordinating prints in many shapes, sizes and designs. Finally, you can purchase your fabric along with the matching pattern, which is a great option if you are overwhelmed with choices.
When purchasing fabric by the yard, you will need to consult your pattern to see how much of each you need. You will also choose the prints on your own, but most stores group fabrics together that look great together to make shopping easier on you. If in doubt, ask a store clerk for some suggestions.
If you love printed fabrics, but think they look too busy next to each other, then break them up by adding in some solid colors. Be sure to have some contrasting colors as well to help the quilt pop.
Precut fabric packs take out the guess work on which designs go well together. They are available in multiple sizes of squares, long strips and sometimes even triangles. Be sure to purchase packs that include the correct sizes for the pattern you have chosen.
You will also need to choose a fabric to use as the backing for your quilt. The two most popular options are cotton or flannel. Both are available in both solids and prints in extra wide sizes, made specifically as quilt backing.
Perhaps you want one of the fabrics that you used on your quilt top to be on the back of the quilt. If they do not have it available in the extra wide sizes, then you can still use it by piecing together several strips. It is totally up to you and either width of fabric can be easily managed as your backing.
Some people also choose to use fleece on the back. It is also available in wider sizes in many fabric stores. If you choose to use fleece, then you may choose not use a batting in the middle because the quilt will be getting pretty thick and heavy.
Finally, you will choose a batting for the middle of your quilt. It is available in all cotton or in a cotton and polyester blend. You can choose a very thin batting or a fluffy batting.
If you are going to be hand quilting, a thinner batting is recommended. If you are machine quilting, then any will do. Choose based on what you think would be most comfortable for you
Piecing the Quilt Top
After choosing a pattern and fabrics, you will need to iron out any wrinkles so the fabric is ready to cut. Then choose which print or solid to use in each section and cut out the fabrics according to the pattern. They are most often square or triangle pieces that you sew together.
In order to make cutting the pieces easier, you may choose to use a large cutting mat with a rotary cutter and a quilting ruler to run the rotary cutter alongside. Alternatively, you can trace shapes onto the fabric with washable pencil or marker and cut them out with fabric scissors.
There are also specialized quilting rulers that come in various shapes and sizes to use with the rotary cutter and mat. These make cutting much faster and more accurate. These will incur some expense but are highly recommended if you decide to make more difficult quilts.
Once the pieces are cut, lay them out to be sewn. Some people lay out the entire quilt top and then gather up the pieces for one square at a time. It all depends on the pattern and what you are most comfortable doing.
Brother SE1800 Sewing & Embroidery MachineHowever you choose to lay them out, be sure that it makes sense to you so you know which piece to grab next. Have your seam ripper handy just in case you grab the wrong piece and need to take out that seam. Mistakes happen with even the most seasoned quilters, so do not be afraid of making one yourself.
No matter which pattern you choose to use, you will always lay your pieces with the right sides together before you sew. This leaves the seam in the back of the square. The seam allowance for quilting is always one-quarter of an inch unless it tells you otherwise.
You may choose to use ball pins to hold the pieces together as you sew. Be careful to remove a pin before you get to it to avoid breaking the needle on your sewing machine. You may also find that you do not need to pin them at all, especially once you are more experienced.

Carefully sew together all of the pieces in your square according to the directions. Repeat this process for all of the remaining squares. Typically there will be anywhere from twenty-four to forty-eight squares, depending on their size.
Once you have the square assembled, the pattern will tell you if you need to trim off any excess fabric. It will also tell you which direction to iron down the seams on the back. It is important to follow the direction the pattern tells you because it will make it easier to sew the squares together once they are all complete.
Once you have your pile of squares sewn up, you are ready to stitch them together to create one large quilt top. Many patterns allow for you to play with the design at this point. Lay the squares out on the floor to see the overall design and to choose their order.
At this point you will take the first two squares, with the front sides facing each other, and sew one side together. Then you pick up your third square and lay it on top of the second square, again with the front sides facing each other. Sew these two together with a one-quarter seam allowance.
Continue in this manner until you have all of the top row sewn together. Turn it over and press all of the seams in the back. Complete this process with all of the rows of squares.
Now you will place your first row strip and your second row strip, with the front sides facing together, and sew these two strips together. Turn it over and press the seams. Now lay the third row over the second row, front sides facing together, and stitch these together.
Continue sewing the strips together until your quilt top is complete. Take a deep breath and be proud! Take a moment to appreciate the beautiful quilt top that you just made all by yourself and know that the most difficult parts are done.
Assembling Your Quilt
Now you will assemble what many refer to as the quilt sandwich. It contains the quilt top, a batting in the middle, and a backing for your quilt. If you needed to piece the backing, complete that step first.
To piece the backing, you will need three pieces that will add up to total width and height that is stated in the pattern. Determine if you will piece it horizontally or vertically. This is totally a personal preference because either way will work fine.
Remember that most people will never see the back. It usually lays on top of a blanket on a bed, so do not worry about being too fussy here. Sew the pieces together and press the seams.
If you choose a wide width, then just be sure to cut it down to the right size. You can do this before laying out the pieces, or you can trim it along with the batting and the quilt top. Again, this is personal preference.
Once you have those pieces all ready, you are going to make your quilt sandwich. You will need a large space for this. Most people use their floor or put several tables together.

First, lay down the backing, with the right side facing down. Then lay the batting down onto the back side of the backing. Finally, lay the quilt top on top of the batting, right side facing up, to complete your quilt sandwich.
If the pieces do not match up, you can do some trimming now or wait until you are done quilting. Use the curved safety pins and pin together all three layers at least every ten to twelve inches. The curved pins help the fabric to stay in place with all of those layers.
An alternative method to pinning the layers together is to use a quilting basting spray. This is an adhesive spray that holds all of the layers in place to make quilting easier. Regular spray adhesives cannot be sewn through, so be sure to get a quilting basting spray adhesive.
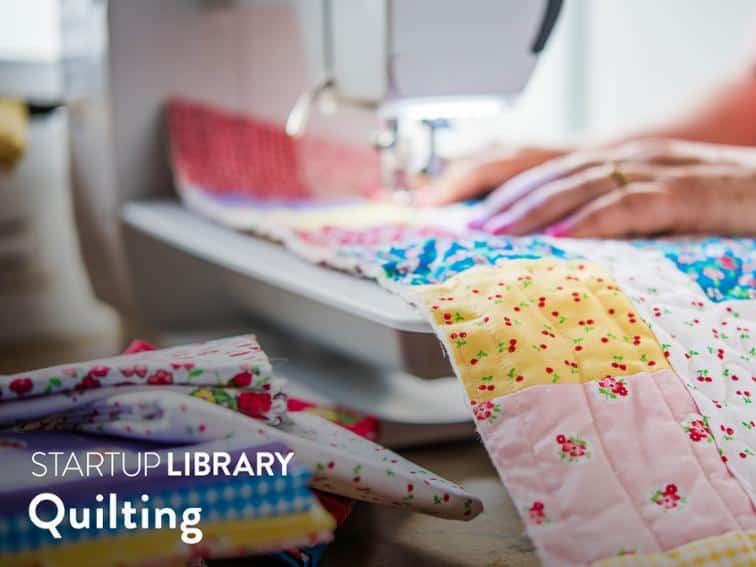
Once pinned or basted together, it is time to do the actual quilting. The quilting is what holds the quilt sandwich together permanently. There are many different ways to do this.
Actual Quilting
While we often use the word “quilting” to refer to whole the process of making a quilt, it is actually the part of quilt making that holds the quilt top, batting and backing together. Hand quilting is a time-honored tradition, but machine quilting has become very popular as technology paves the way for extreme quilting.
It can be tricky to use a regular-sized sewing machine for quilting larger quilts. You will need to roll up the quilt as you go to keep it out of the way.
The easiest and fastest way to quilt is to use your sewing machine and “stitch in the ditch”. This means that you follow the seams that are already there and just sew over top of them. It is basically outlining what you have already pieced together.
Another easy way to quilt with your sewing machine is to simply do straight lines. This works great with some patterns, but it will look awful with others. Always refer to your pattern for suggested quilting styles.
You can also use a sewing machine to do free motion quilting. It will require a specific foot, and you will need to lower the feed dogs on your machine so that they are not pulling the fabric through. This allows you to guide the fabric wherever you want it to go.
Free motion quilting allows you to create your own design as you go. You can also use a stencil and trace on a design to follow. Be sure to use wash away pencil or marker.
There are also many fancy quilting machines available with long arms to make it easier to quilt large quilts. Many can be programmed with the design and then they do all of the work. Embroidery machines are also popular choices for adding detail to quilts.
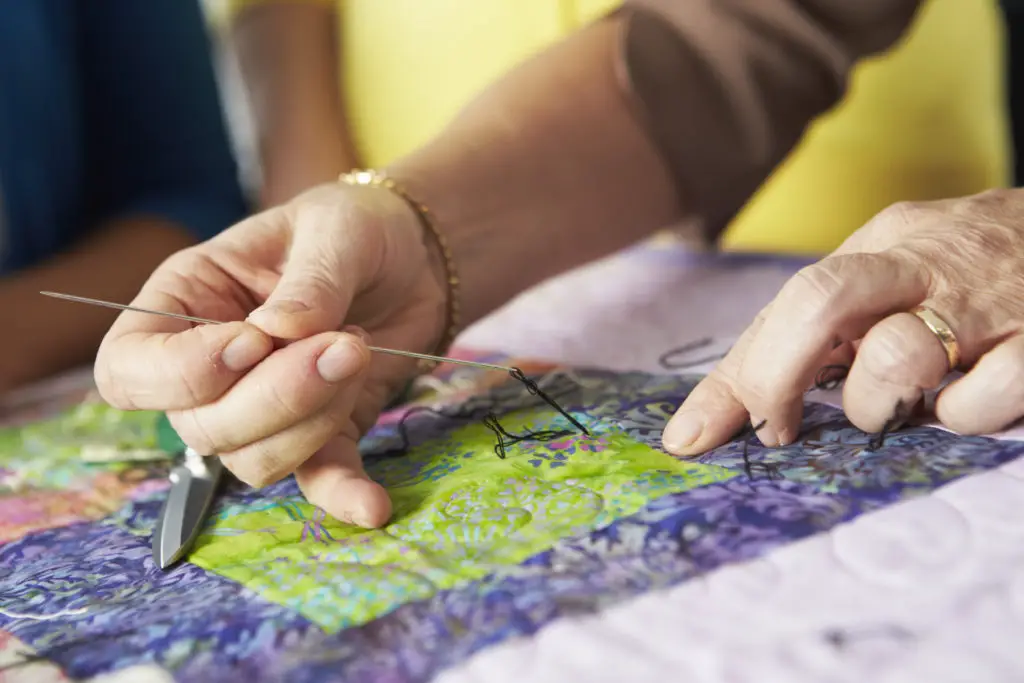
Originally, quilting was all done by hand, and many people still like to honor that tradition. There are several different ways that you can approach hand quilting.
You can use stencils, as mentioned above. You will need a quilting hoop to place around the area that you are quilting. This makes it easy and more comfortable to complete the stitching.
You can also simply outline designs in your fabrics when you quilt by hand. If you have prints mixed with solids, be sure to still do some stitching on the solids as well. Triangles are often quilted by stitching a line one-quarter of an inch inside its border.
Be sure to have a thimble and beeswax handy when quilting by hand. The thimble will save you from poking yourself and soiling the quilt. The beeswax is used to coat the thread as you go so that it will glide more smoothly through all three layers.
Once you are finished, be sure to remove all of the safety pins. Then be sure that your edges are straightened up. Even if you already completed this step, sometimes there is some movement during quilting.
Finishing Off Your Quilt
Now that you have completed the quilting, it is time to add the binding to give your quilt a smooth, finished look. Bias tape is used most often for binding.
You can buy pre-made bias tape in packages, but it usually only comes in solid colors. You can also make your own with a bias tape maker or even just with an iron and a lot of patience. If you make your own, you can choose any solid or print fabric, perhaps one that you used in your quilt top.
To make your own bias tape, you must first cut the fabric on the bias, or diagonally. Most cutting mats have markings to follow for this type of cut. Cutting on the bias allows for the fabric to have a tiny bit of stretch.
Your strips will vary in length depending on the size of the fabric that you are using, but the width is up to you. If you want binding that is one-half of an inch, then you will need two-inch strips. Always multiply the width that you want your bias tape to be by the number four.
Once you have your strips cut on the bias, then you will fold each side into the middle and iron them down. Now fold it in half and iron again. You are left with a nice finished edge that will cover the raw edges of your quilt.
There are several different ways to attach your bias tape, so you choose what feels best for you. Some people simply top stitch all the way around.
Some others feel that it is sloppy-looking to top stitch. They will either hand sew the top and bottom with a blind stitch, or they will use a machine on the top and hand sew the bottom.
When using a machine on the top only, you will open up the bias tape and stitch right in the fold so that the stitching cannot be seen from the top at all. Choose whichever way you think looks best and makes the most sense to you.
You are almost finished. Add a “handmade tag” if you wish, wash out the pencil or marker if you used any, and double check for any pins left in the quilt. Stand back, take a good look at your masterpiece and be super proud of yourself!