How to Incorporate Vintage Style Crocheted Doilies into Your Quilts
Crocheted doilies are very popular right now in all decorating. They hang on walls in hoops and they sit on tables under our books and trinkets. Why not add them to a gorgeous quilt?
Both traditional quilts as well as art quilts are popping up all over with crocheted doilies, and they look amazing. Here you will learn where to find doilies, how to incorporate them into your quilts, how to attach them, how to quilt them as well as tips and tricks to use along the way.
Where to Find Vintage Style Doilies
Check with your family first. They may have doilies that were crocheted by a loved one and passed down through the years. Using them in a quilt would be a wonderful way to remember the person who made them.
Thrift shops and antique stores should be next on your list if you want to find doilies with a vintage look. Look for a variety of shapes, sizes and designs. If you cannot find any truly vintage doilies, there are still lots of other options.
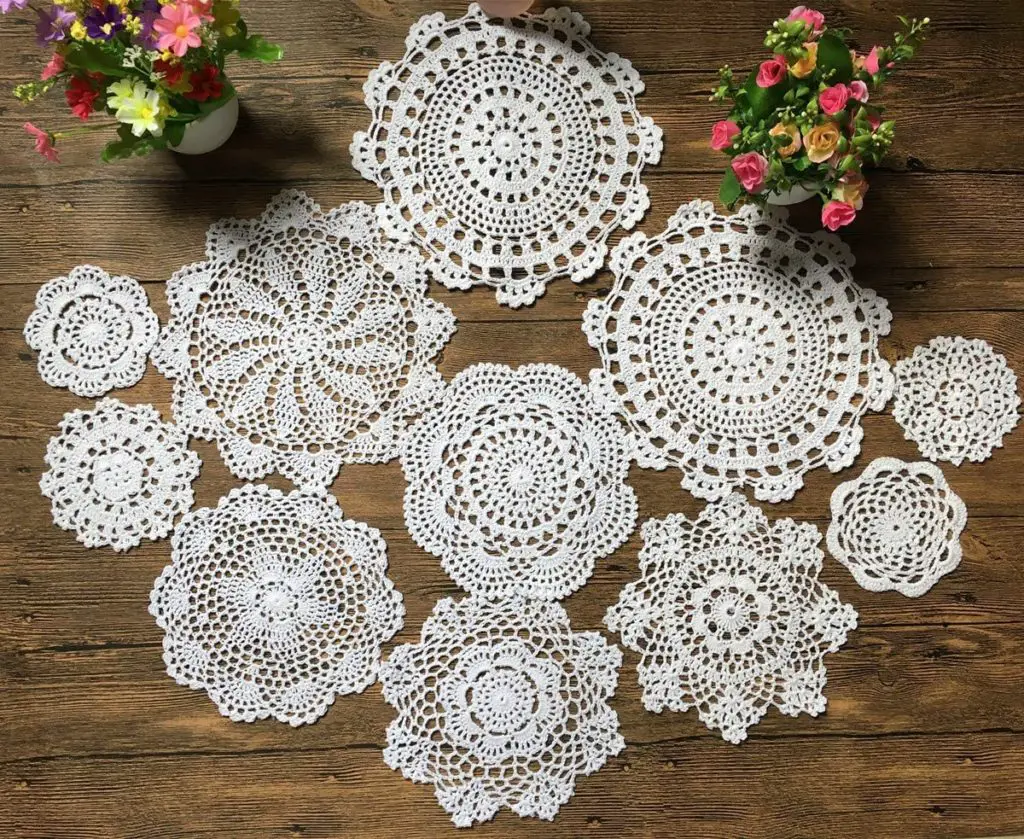
You can purchase crocheted doilies in all sizes and colors at craft stores and online. You can also get a pattern to crochet your own. If you do not know how to crochet, maybe see if you have any friends or family who are willing to help out.
How to Incorporate Crocheted Doilies into Your Quilts
If you are making a more traditional quilt, then you will want cohesiveness. Traditional quilts tend to keep to proportions, with very neat and even lines. You will want to plan ahead with this in mind.
For a traditional quilt, you may wish to keep the doilies the same size and similar shape when they are part of the same square. For example, maybe all of the corners squares will have a medium sized doily in the center. Then all of the squares next to those will have small doilies.
Consistency is what matters most here. Whatever you do to the top, do it to the bottom also. The same goes for the sides. Corners tend to be the same as well.
So, as mentioned above, maybe you will place a doily in the center of a square. You can still incorporate other shapes inside that square, but be sure that the doily is not overlapping any other shapes.
Keep in mind that the guidelines above are just for traditional quilts, and they are just guidelines. One of the best things about quilting is that you can make it however you want to make it.
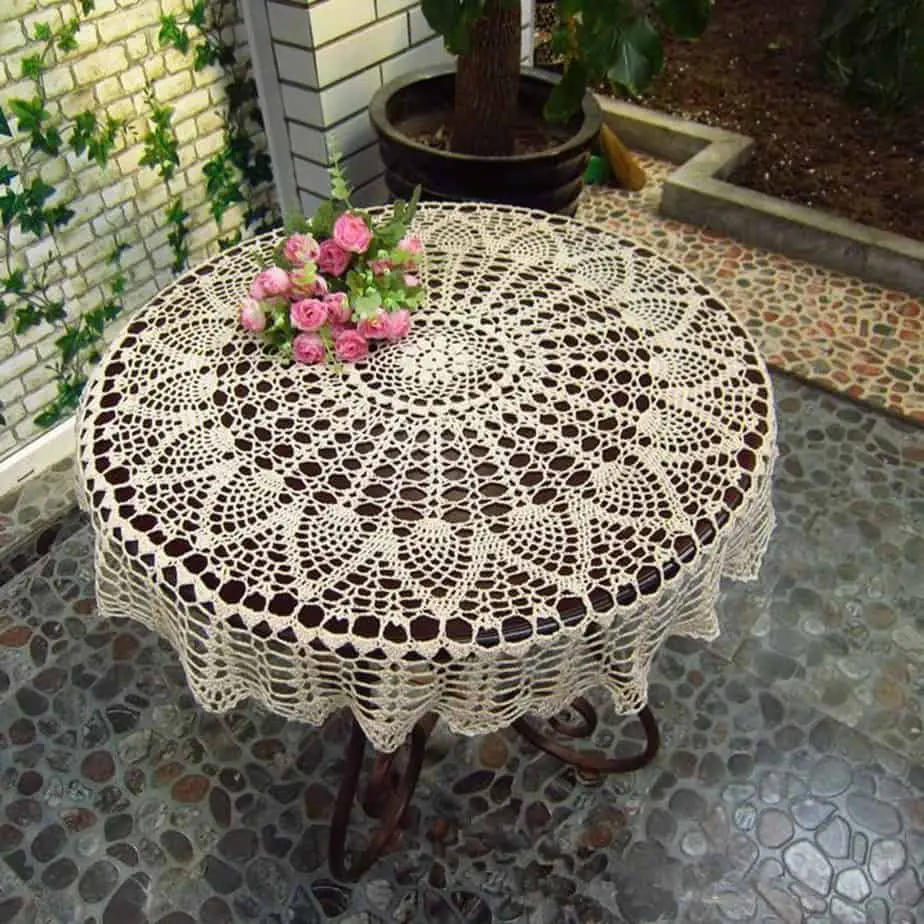
You can also get a very large doily to use as the main feature of the entire quilt. For this, it is recommended that you use one that may be listed as a circular table cloth so it is large enough. This looks stunning when put on top of a solid color or tiny print and quilted around.
In art quilts, the doilies can be all shapes, sizes and colors. They can overlap or even go off of the edge of the quilt or wall hanging. You can add embellishments too, and there is more on this in the quilting section.
How to Adhere the Crocheted Doilies to Your Quilt
The first way to adhere the doilies to your quilt is by using an adhesive. These can be temporary or permanent, depending on which you choose. Keep in mind that you will be doing at least some quilting to help hold it in place, so you do not need tons of adhesive.
You can use a 2-sided interfacing such as Wonder Under or HeatnBond. These types of interfacing will essentially turn your doily into an iron-on. Follow the directions on the package to adhere it first to the doily, and then adhere the doily to the quilt.
These interfacings will work best on larger doilies. Smaller ones may have some spaces where the glue forms a web from one thread to another. If this happens, simply cut out the extra adhesive before ironing it onto the quilt.
It is also important that you have a paper towel to cover the doily when you are first ironing the interfacing onto the doily. This is because the adhesive will be exposed where there are holes in the doily and you will want to protect your iron from getting adhesive on it. If you do accidentally get some on your iron, as many of us do, this iron cleaner will help.
The extra adhesive will iron onto the paper towel and you can simply peel away the paper towel. Sometimes the adhesive will bond between the towel and the doily, but it can be easily cut once cooled.
Both of those interfacings can also be sewn through once they cool down. This leaves room for you to do the quilting however you want. Alternatively, you could use fabric glue.
Fabric glue comes in many forms. Be sure to read the label, and get one that says it will dry clear, is washable and is flexible. A fantastic fabric glue is Aleene’s Fabric Fusion.
Finally, if you do not want to bother with adhesives, you can stitch the doily on by hand. Pin it in place and use stitches that will wrap perpendicular to each of the doily threads that you stitch. This will help keep them from sliding.
Alternatively, you could stitch right down the middle of each if you want to hide your stitch, but then the edges will likely be loose. They could catch on something and tear, so be sure to stitch down loose ends.
When stitching by hand, you can choose a thread that matches the doily to camouflage it. You could also choose an invisible thread. This is a little more difficult to work with, but with some patience, you can make it happen.
Determining how you will adhere the doily will largely depend on the design of the doily itself. Just be careful that the doily does not droop when the piece is picked up.
How to do the Quilting on a Project with Crocheted Doilies
When using one large doily, the patterns that you choose to quilt are important because they will be particularly noticeable if you are using a solid color or tiny print behind the doily. Also, the corners will have large areas that are not covered with by the doily which allow you to be super creative.
You can certainly look for stencils to use for these spaces. You could also draw on your own design to quilt. Mimicking shapes within the doily will help it to truly stand out.
On quilts that have doilies as the center of each square, find points on the doily to highlight. You could add a French knot with embroidery floss, stitch on a button or a bead or simply just stitch in that spot.
You can also quilt around the outside of the doily. Use small stitches so that the doily remains the star. Finally, you can quilt right over certain parts, but be sure that you doily is strong enough that it does not get pulled crooked.
For art quilts, you can really let loose with your quilting designs. You can add fibers or trims around the doilies. You can bead the entire way around them or highlighting certain areas. You add rhinestones or gems on each point.
Be creative and see what you can come up with. Layering is huge in art quilting, so using different colors of doilies layered and quilted in a contrasting color would make a great statement.
Tips and Tricks
1. If you are using an old doily that needs washed first, let it soak in a scent free mild baby detergent for about ten minutes. Gently rinse by hand and air dry. Do not twist or ring so that it keeps it shape.
2. Some yellowing may not come out. Use the yellow to your advantage by incorporating similar yellows in your quilt. It will look purposeful as if you wanted to showcase the fact that it is antique.
3. Do no limit yourself to using doilies only on quilts. They will also look great on wall hangings, purses, placemats, throw pillows, book covers, table runners and mug rugs just to name a few.
4. You can dye your doilies if you want a color that you cannot find. One-hundred percent cotton doilies are best for using dye on. If your doily is synthetic, be sure to use specific dye for synthetics.
5. You can even use tie dye methods on doilies. Be certain to use cotton string to tie them because the rubber bands can damage them.
6. After you are all finished, wash your hands and then lightly run them across each doily. If there are edges that are catching, be sure to tack those down with some fabric glue or sew them down by hand.
7. If you get stuck on where to quilt, use the design on the doily as a guide. Do you see a star or a flower pattern there? Highlight the center and each end point.
8. Think outside of the box when doing an art quilt with doilies. You could group smaller doilies together near the top and cascade them down like water, with larger doilies at the bottom to mimic a waterfall. You could use a single doily as the sun or the moon.
In Conclusion
Quilting has become such a great art today, and its basis still holds deep tradition. Taking it to new level by introducing items such as crocheted doilies not only allows it to expand as an art, but also allows us to pay tribute to loved ones who crocheted doilies.
Even if you do not have any doilies that are family heirlooms, you can feel good knowing that you are on-trend with your crocheted doily projects. Quilters saw people just putting them in embroidery hoops and hanging them on the wall. Then they got to work finding beautiful ways to showcase them in their work.
Give crocheted doily quilting a try. If you are nervous about working with large doilies, then start with a smaller project like a mug rug. Most of all have fun creating a work of art and enjoy the process.