Ultimate Guide To Sashiko Embroidery|Tips And Tricks To Get Started
If you like needlepoint, you are probably always looking for new patterns and new ways to use floss and thread on cloth. Perhaps you find the hobby soothing, or perhaps it’s more creative to you than picking up a brush and paint. Whatever the reason, needlepoint projects are your bag.
If that is the case, you will love Sashiko embroidery. This type of embroidery may look like you handstitched quilted fabric, but it is actually a form of Japanese embroidery. Here is more on Sashiko, and how to get started.
Traditional Sashiko
A good place to start is right where Sashiko starts. Historically, this form of decorative embroidery was used to enhance the padding in Japanese warriors’ armor. It then became a form of household decoration. It evolved into an art form, becoming more and more elaborate over the centuries, which gives this form of embroidery a very rich contextual history indeed.

- THIS SET has all necessary tools that you can enjoy straight away even if you never experience Sashiko before. We offer the items all together at a reasonable price so that you don’t have to purchase separately anymore, such as 100% cotton cloths with Japanese traditional pattern, Sashiko sewing threads and DARUMA Sashiko needles as well as thimbles. You will be able to enjoy Sashiko as soon as it comes to hand. Even Sashiko experiencers will certainly be satisfied for this special kit.
- SASHIKO TIN: Sashiko Stitching Fine Thread is most popular thickness. It is suitable for sashiko stitching, embroidery and stitch. Small relled thread is as long as you can stitch one YUMEFUKIN
- YUME FUKIN: Yume Fukin is cloth for Sashiko stitching. You can make a Sashiko Fukin by just sewing along pattern pre-printed. After finish sewing, washing in water clean off pattern pre-prented from cloth.
- SASHIKO NEEDLES: There are 4 kinds of needle having each length and thickness. You can choose a suitable needle for different thickness. They are suitable for quilting with thick thread, embroidery and stitch.
- THIMBLE: Thimble is indispensable for Sashiko. There are three kinds of thimbles that can be used in various ways; when using longer needles or when using heavy fabrics.
Basic Steps – You Will Need:
- The Right Sashiko Needle – you can’t use just any old needle to create this distinctive look. Sashiko needles are rigid, long, and very sharp for a reason.
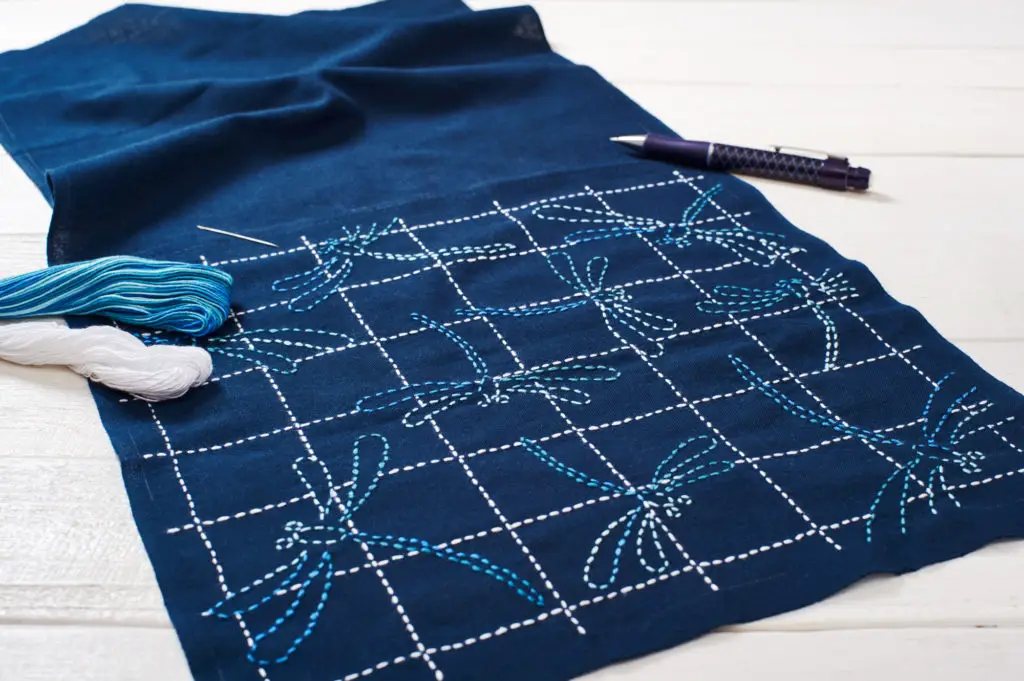
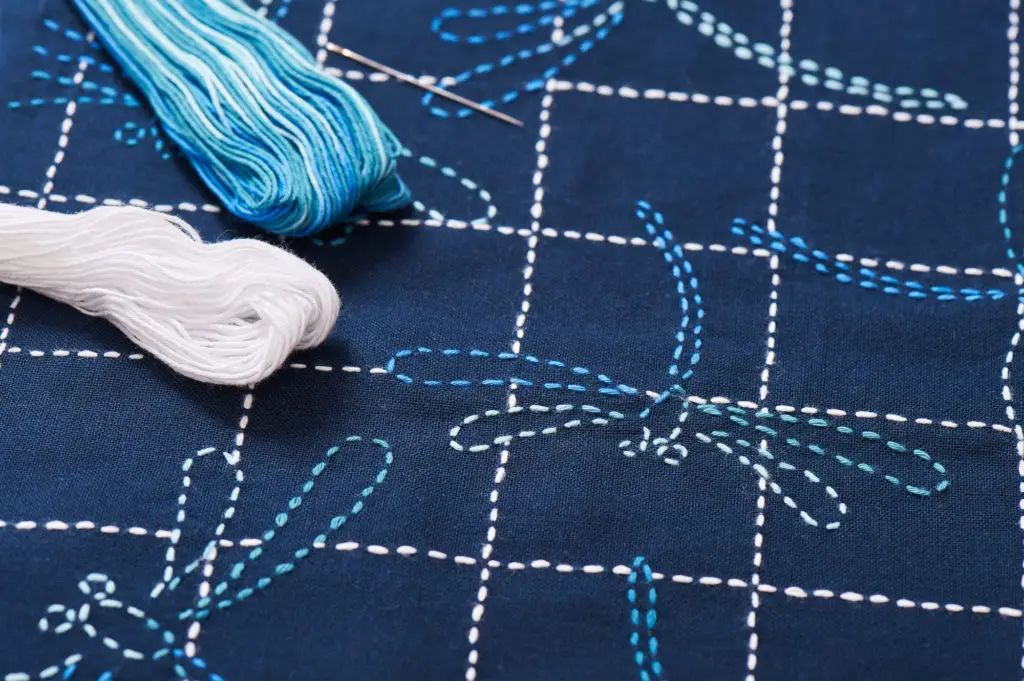
- Sashiko thread – This type of special thread is a matte cotton that is both soft and strong with a twist to it. Heavyweight thread is ideal, since lighter weight thread might break. In traditional Sashiko, the thread is white so as to give a very dramatic appearance against the dark blue of the cloth.
- Fabric – Indigo cloth is the most traditional type of fabric used in Sashiko. However, anything similar to it will work well, especially when you are just first learning the techniques.
- The Design – These usually include geometric shapes and interlocking patterns that create tesselations. You can use these patterns to trace onto the fabric or iron on before you begin making any stitches. Check out some free designs you can find here or check out the Amazon resources below for more ideas.
- If you’re going to trace or draw your design directly onto the fabric then you’ll need a quilting ruler and a water-soluble marking tool. If you trace, use a white cloth marking pencil, creating dashed lines instead of complete lines on the fabric. You do not have to follow the dashes exactly because they are guides, but your stitches will be very dash-like. Make every stitch small, close together, and as straight as you can.

- Nihon Vogue (Author)
- English (Publication Language)
- 120 Pages - 11/10/2020 (Publication Date) - Tuttle Publishing (Publisher)
Basic Stitching Steps
Don’t worry if you can’t pick this up right away. Have patience and give yourself some time to learn the proper way to stitch.
- Draw a 1″ x 1″ grid out onto your fabric with the quilting ruler. Having a grid is the best way to ensure that your geometric pattern stays accurate.
- Draw or trace out your pattern onto the grid . Again, I recommend to draw dashes instead of a full trace to help you place your stitches but it’s not entirely necessary.
- Here comes the “hard part” – pre-load your sashiko needle with multiple “bites” of the fabric (see the picture below). When you pull the thread through the fabric after this, you will create the dashed lines that you want.

- And then just keep going! Don’t worry if your stitches are even and straight the first time. This technique takes practice. Once you’ve finished a project or two, the basic idea becomes easy to accomplish.
Less Traditional Sashiko
Less traditional Sashiko embroidery incorporates some of the basics of traditional, but with modern twists. You can use any color of cloth, as long as it has a similar weight to broadcloth or lightweight denim. Avoid using heavier fabrics, or fabrics that will tear or unravel easily.
The thread and needles for the more modern version of this ancient form of embroidery are the same. Stick to the same lightweight needles and heavyweight thread.
You may also use two to three strands of embroidery floss, but make sure the colors are not glossy smooth or metallic. Additionally, instead of white, modern Sashiko embroidery allows for any one of a variety of colors, so long as you choose just one color and stick with it.

Patterns for modern Sashiko include designs from 1970’s batik florals to complicated and tessellated geometric shapes. Whatever strikes your fancy and can be used for embroidery will work. The stitching technique is also the same; tiny, closely spaced stitches that look as though they have been sewn by a machine and not by hand.
Extremely Creative Sashiko Bordering on Quilting
Sashiko embroidery can be used to create beautiful, Japanese-inspired quilts. To make this work, you will work through huge pieces of cloth, creating an all-over pattern on the correct type of cloth the size of a blanket. You will not be stitching through padded cloth, but instead be creating the design on two same-sized pieces of fabric.
It will take a long time to complete such a project, which is why you may want to put this one aside until you are comfortable with doing Sashiko and you are getting really great results. If you decide to make the quilt and you have completed the design on two pieces of cloth, you can use a layer of quilted batting in between the two pieces of Sashiko-embroidered cloth. Then stitch the edges together, and put key stitches in certain areas of the design such that the stitching looks like part of the embroidery.
You can use many of the more modern and beautiful Sashiko designs for a bigger project. These designs will have to be transferred by hand and traced, given that the pieces of cloth will be too big for iron-on pattern transfers. If you are the ultra-creative type and you develop an eye for these designs, you could create your own Sashiko embroidery design and run with it.
Where to Buy Sashiko Supplies
If you are really new to this style of needlepoint and you just want to try it without any major commitments, online retailers that sell everything from soup to nuts offer a few introductory kits. The kits include everything you will need to make a small sample project (or two!) of Sashiko embroidery. If you decide that you really like this form of needlepoint, you can move on to bigger kits, or buy more supplies outright.
If you buy individual supplies outright, then follow the instructions included in your basic kit for the type of cloth you will need. If you bought a basic kit, you really do not need to buy more needles of any size, since Sashiko does not require a wide range of needle sizes like crewel work or punch embroidery. You will need more thread of the correct type, or embroidery floss, depending on what subtype of Sashiko you plan to do.

- A must buy product
- Used for silk ribbon and yarn embroidery, typing quilts and candle wicking
- Made in japan
Additional supplies that may help but are not required for this hobby are a large embroidery hoop to help keep your fabric taut, and a needlepointer’s magnifying glass and stand. A light to help you see your stitching better in a dark room is also a good idea. As a final suggestion, get a few books on this embroidery technique, and several ready-to-use Sashiko patterns to help you get started.
Online Resources to Learn More
As with any craft or art project, you can always learn more from online resources. There are tutorial sites that will show you how Sashiko is created and made. There are Sashiko project ideas on other sites. There are even Sashiko crafting sites that are meant for fans of this form of needlepoint, and who regularly come together to discuss in forums what they are working on and collaborate sharing tips.
Check Out My Sashiko Pinterest Board For More Tips And Patterns
Don’t forget about the social media sites either. Some post some amazing finished Sashiko projects to inspire you. Others will host events where you can trade materials and work together as a group on your individual projects. Some days it helps to have a little motivation from other embroidery enthusiasts when you have a project you want to finish, but you can’t seem to get going.
If you are particularly interested in the history of Sashiko, and not just in the hobby itself, then you can find sites that delve into how it was created and how it was used centuries ago. Some needlepointers and embroidery enthusiasts love learning about the history of their craft as well as learning the craft itself. If that interests you, there are certainly enough websites that will help you research and learn more while you are teaching yourself how to do Sashiko.
Very thorough and informative article. Easily understood and well written. The information is complete. I enjoyed reading and passing it on to my fellow Quilter’s.
Very good tutorial for the absolute beginner. Thank you